
Online stores are one of the most popular types of businesses on the internet, and if you have ever been into it, you should be familiar with Shopify. It does not matter what you are planning to sell – food, clothes, digital products, services, whatever. This e-commerce platform will help you with everything from setting up the store itself to getting analytical reports that could help to scale up your business. However, what can scale up Shopify itself? Here we come to today’s topic, which is how server-side tracking can help to do and how to set it up.
Understanding server-side tracking
Server-side tracking technology allows you to collect data from the client’s device and send it to a designated server before it is processed by an analytical platform. This allows us to solve several major problems everyone working in online marketing faces nowadays:
- privacy policies compliance;
- ad blockers;
- browser restrictions.
These three issues cause many marketers and businesses not to get the correct analytical data and, as a result, optimize their campaigns badly and lose profits. Sounds like a nightmare for everyone working in the sphere, right?
Server-side tracking kills three birds with one stone by simply placing a server between the client and the analytical platform. This server enriches the received data (adding or restoring elements like user IDs that may have been lost due to browser restrictions or tracking limitations) and ensures compliance with privacy regulations by hashing or encrypting personal information. The processed data is then sent to platforms such as GA4, Meta Ads, TikTok Ads, or any other destination relevant to the business. As a result, marketers get better structured and more precise analytics, which allows them to plan all their activities better and improve both their service and profits.
When we mention improving the service, this is the thing many experts talking about server-side tracking often forget. Clients suffer from incomplete data not less than businesses: bad targeting, worse attribution, and generally worse customer experience. Thus, placing a server between the client and the analytical platform is a win-win decision.
How server-side tracking operates with Shopify
We will explain how the server technology interacts with Shopify and then move to a practical guide on how the system can be set up in the most convenient way and with the least effort.
The algorithm
The whole process of tracking Shopify data via a server consists of several steps, which can be similar to the client-side tracking procedure with some important changes at certain stages.
- First of all, a Google Tag Manager container is needed. Moreover, it should be hosted on a server, where you will manage your tags, triggers, and where all the requests will be handled.
- Purchase events, page views, operations with the cart, wishlist data, etc., are sent to the server.
- On the server, the data is modified to comply with the privacy policies, complemented by all the important or missing information, and structured. Advanced triggers can be set up to get more control over it.
- When ready, the data package is sent to the chosen (via tags) analytical platform or platforms (if needed, you can operate with multiple).
Described this way, server side tracking shopify looks quite simple to operate, and on one side, indeed, it is. On the other, however, it is important to set everything up properly. And we have great news for you here!
Setting up server-side tracking for Shopify
The news is that you do not have to do everything yourself. There are specialized platforms that can organize the whole server-side tracking process for you without any need to bother and learn all the technical nuances yourself. We will not describe all of them, as we simply do not have enough space here, but we can provide one of the most popular titles as an example – the Stape Server GTM app.
- Obviously, the first step is to sign up with the platform.
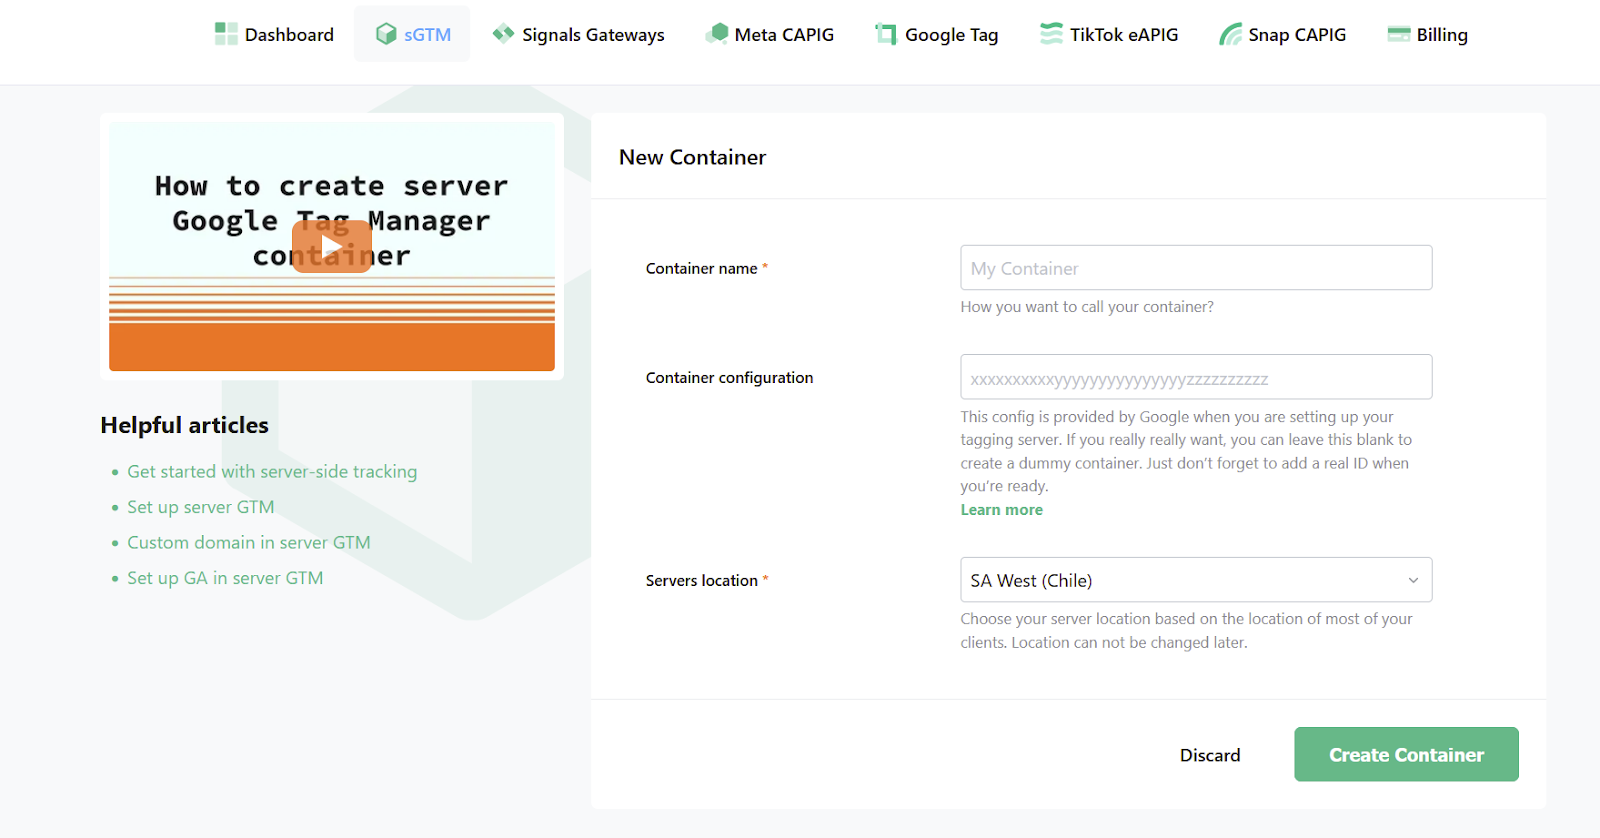
- Create a server GTM container on the official website (tagmanager.google.com). Copy the link you get when you finish.
- Open the dashboard in your personal profile and create an sGTM container. Add the domain name and paste the link you got in the previous step.

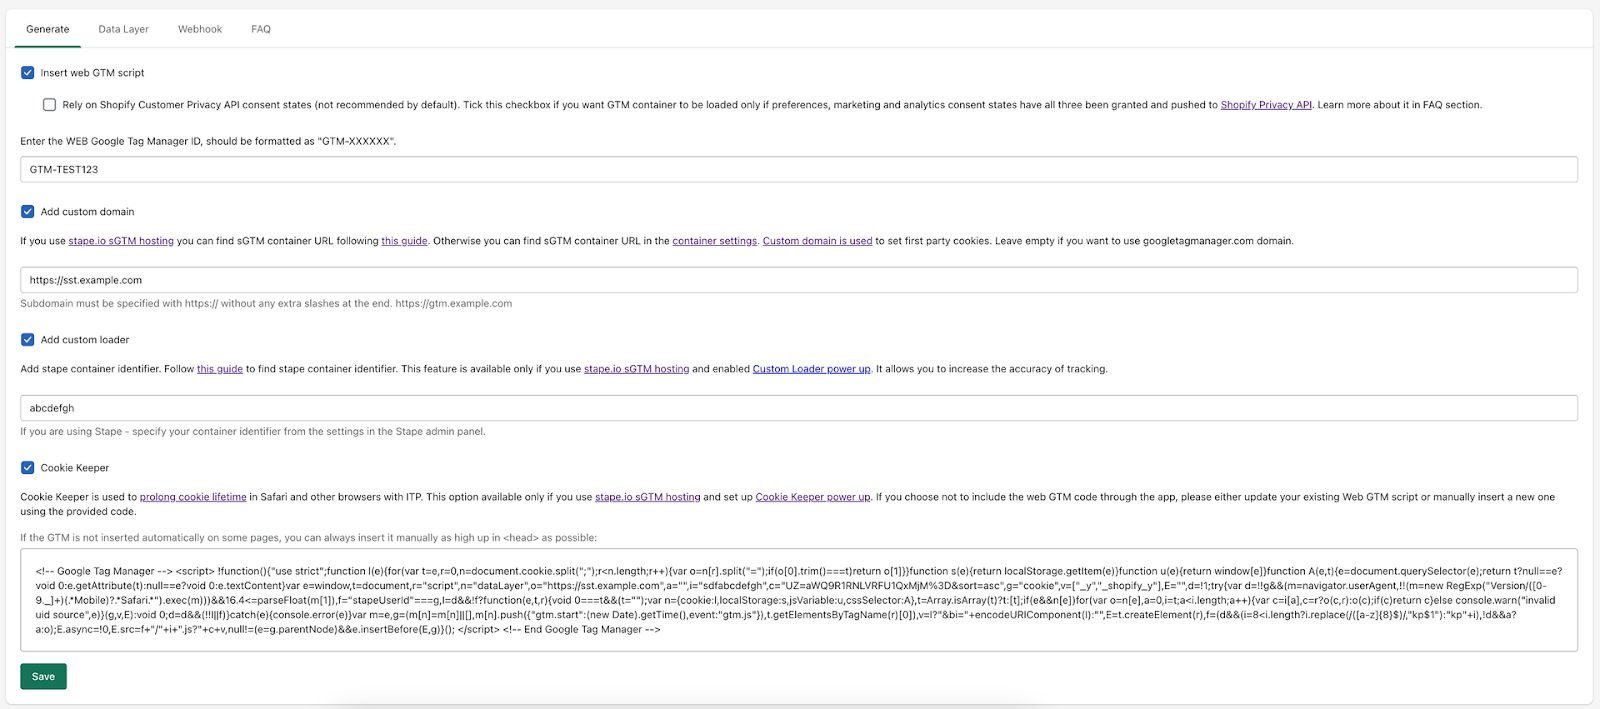
- Log into your Shopify admin panel and find the Server GTM app in the store. Install it and add your GTM container ID and custom domain. All other fields are optional here and depend on the additional services you use.

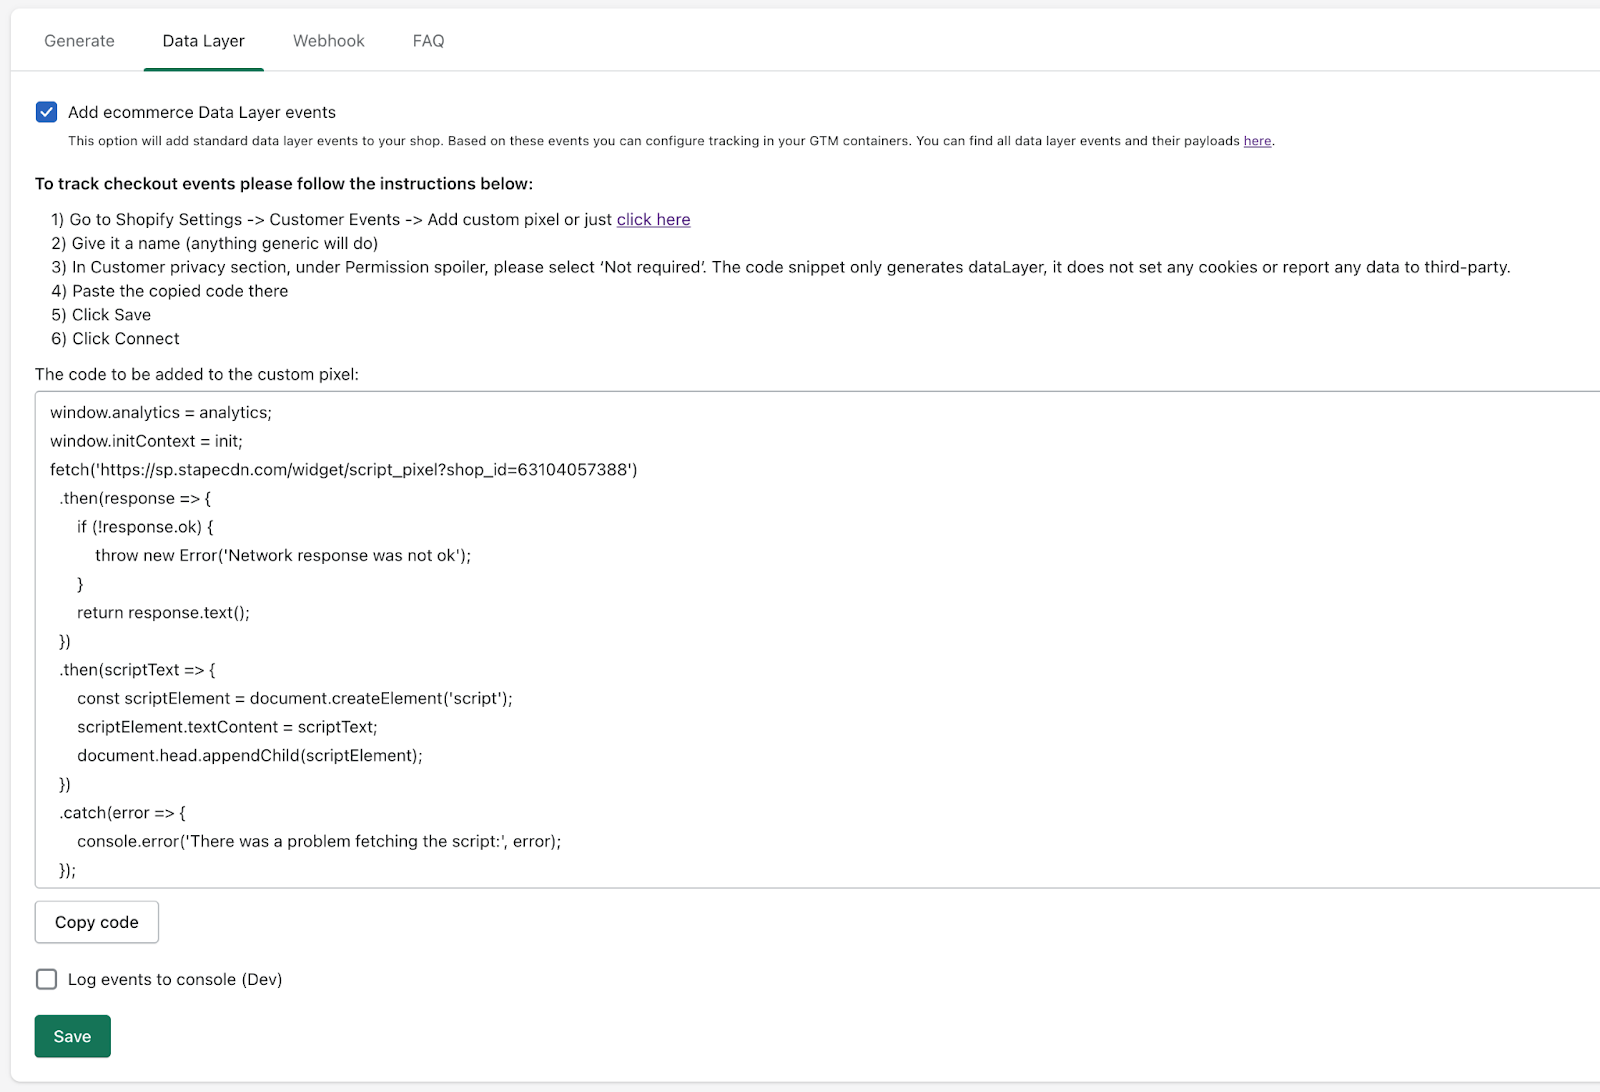
- Switch to the Data Layer tab and tick “Add eCommerce Data Layer events”. Click save, and then copy the code that appears on your screen. You need to paste it to your custom pixel, and if you do not know how to do so – there is a guide above the code. Do not forget to select “Not Required” for Permissions.

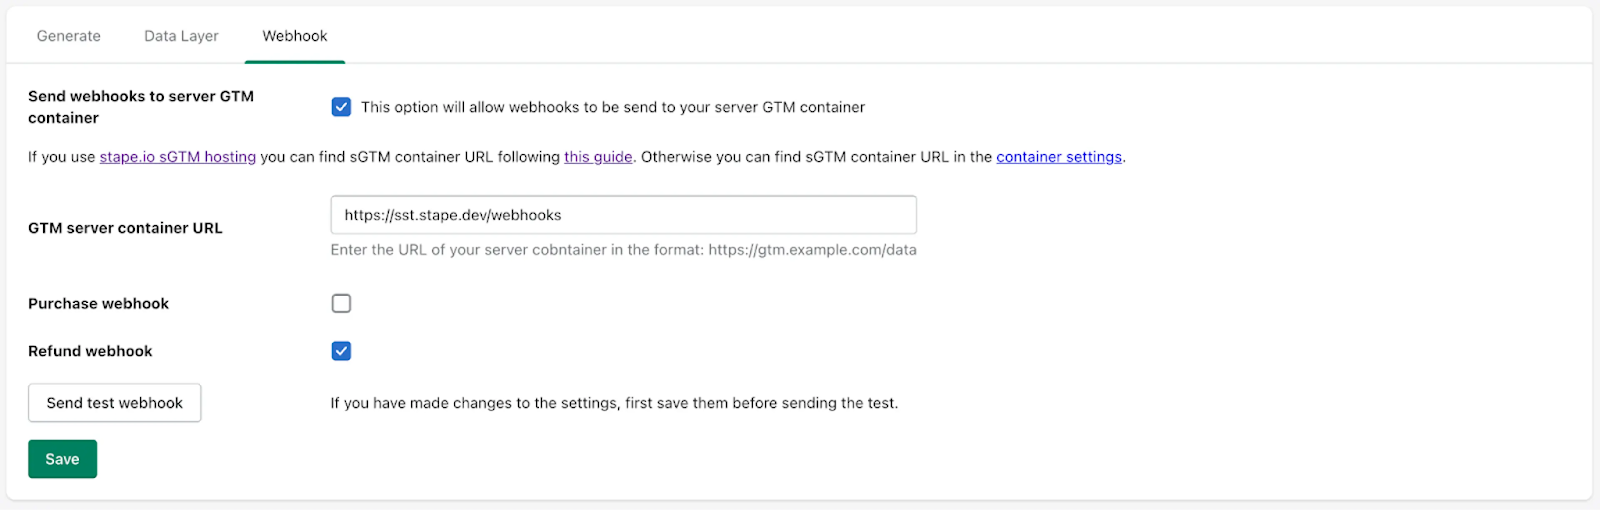
- By default, you do not need the Webhook tab, but if, for some reason, the data is not tracked online, you can tick the “Send webhooks to server GTM container” option and share the container URL.

- When all is set, you need to start sending the data to the freshly-created sGTM. It can be done via GA4 or Data Tag/Data Client.
- Finally, you need to add corresponding APIs, depending on the analytical platforms you are planning to use: Snapchat CAPI, Facebook CAPI, TikTok Events API., etc.
Although it may still look like a lot of work to be done on your side, even if you use another platform to set up server-side tracking, most of the companies have detailed guides on how to do so. In case of any issues, their customer support services are always to your service (pun intended).
Some nuances
There are several important points when it comes to server-side tracking that are not on the surface but still may affect your experience, so it is better to be aware of them.
- When using server-side tracking, you may often send data to several analytical platforms, which means several integrations. Correct configuration to ensure effective data flow is crucial; that is why it is better not to experiment with configuration on yourself if you do not have a solid idea of what you should do.
- It is important to understand what data you need to filter and what to keep. Filtering important data points or key events may lead to incorrect results and affect your experience. Find the right balance, and do not filter anything you cannot answer about why you are doing so.
- Placing a server between a client and an analytical platform results in additional time needed for data processing. Ideally, you should not notice this, but if the system is configured not optimally, the delay may be significant. To avoid this, you need to monitor the server performance constantly and be ready to fix any issues that may arise.
These are the main points you need to pay attention to and, to our mind, the most crucial ones for those only starting their trip with server-side tracking. Of course, with experience, you may discover some other important areas that will require your attention, but it is already another conversation.
Conclusion
In today’s reality, server-side tracking is a must-have tool for all the online businesses that have stores on Shopify. After you host a server GTM container and link it with your Shopify account, you can share much more precise data with analytical platforms and plan your marketing strategy better.
Setting up server-side tracking is not as difficult as it may seem at first glance. Specialized platforms allow marketing specialists to focus on their work and take all the technical configuration and maintenance on their shoulders.
Thus, if you are thinking in the direction of developing and boosting the eCommerce business that you run using Shopify, server-side tracking is a step in the right direction. It will allow you not only to increase the ROI but also to improve the customer experience, which will attract even more people to your store.